[KEPCO] Constructing Demo System for AI based Diagnosis_2
Goal
To understand and install
Docker
To understand the brief concept ofGPG key
Docker를 이해하고 설치해보자
GPG key의 개념을 이해해보자
System Specification
This project uses following HW resources.
본 프로젝트에 사용된 HW 리소스는 다음과 같습니다.
- Oracle Server: Linux (
Ubuntu 20.04) (Today’s Use)- AI Server: Linux (
Ubuntu 18.04)- Client Server: macOS (
Big sur) on M1 chip
About Docker and Its Installation
First, I am gonna use Docker Engine for the administration entire SW. What is Docker Engine? Since Docker Engine has been explained a lot in other blogs/posts, I will simply explain it concentrating on the concepts that is required for this project. the official homepage of Docker Engine explaines as;
저는 도커 환경을 사용하여 전체적인 SW를 관리할 예정입니다. 먼저 도커란 무엇일까요? 도커에 대해서는 이미 많은 블로그/포스트에서 다뤄왔기 때문에 본 내용에서 필요한 개념만 중심적으로 설명드리도록 하겠습니다. 도커 공식홈페이지에서는 다음과 같이 서울하고 있습니다.
Docker Engine is an open source containerization technology for building and containerizing your applications.
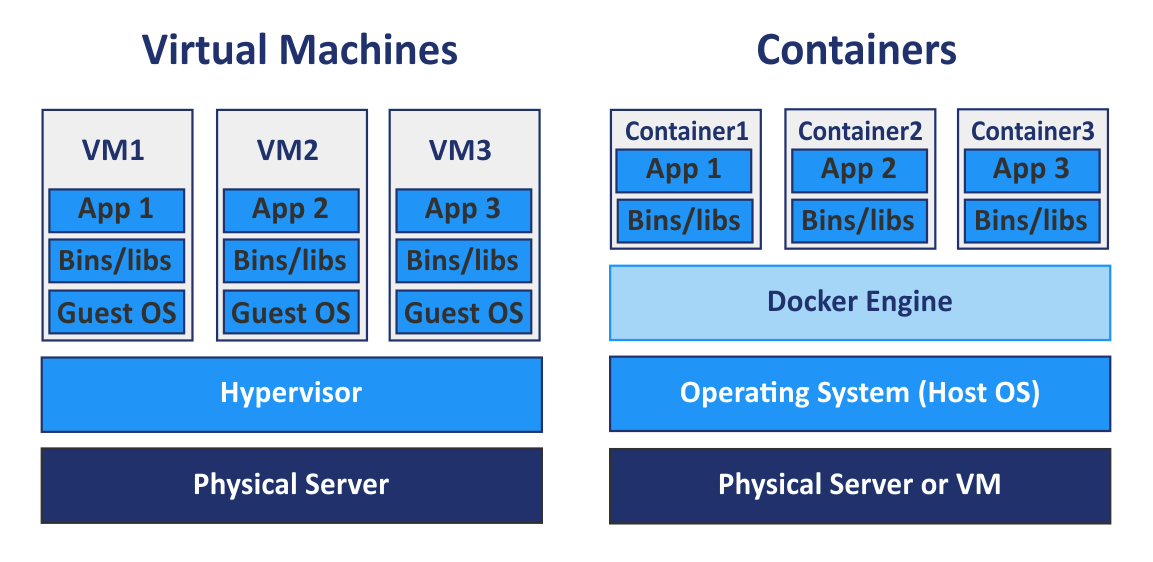
Simply, Docker is a virtualization tool that uses a container. In the past, it was required to virualize entire system including os, driveres, and libraries and that resulted in huge overhead. (Toughly explained) Docker loads required libraries on container and runs it, utilizing existing ingredients on server as much as possible.
자 여기서 필요한 개념 위주로 쉽게 설명하면 도커는 *컨테이너를 사용하는 가상화도구입니다. 기존에는 OS 전체를 가상화해야했기때문에 오버헤드가 상당했는데요, (거칠게 설명하면) 도커는 활용할 수 있는건 기존꺼를 최대한 쓰면서 추가적으로 필요한 것들만 컨테이너에 담아 돌린다고 보면 됩니다.*
Then, what is the reason for using Docker? There could be various reason, but one of the most important one is that it could ease the compatibility issue for publishing the service. Most programs refers various libraries including OS. The problem is that these libraries is developed and updated independently. Suppose that we built “A server” with “Oracle of version X” one year before. And today, we build “B server” which has identical HW specificatons and “Oracle of version X”. Do you think both of them will operate identically without any issue? Unfortunately, the answer is no.
그러면 도커를 이용하는 이유는 무엇일까요? 많은 이유가 있겠지만 가장 대표적인 것은 배포를 위한 Compatibility 문제를 손쉽게 해결할 수 있다는 점일겁니다. 대부분의 프로그램은 운영체제를 포함한 다양한 라이브러리들을 참조하게 될겁니다. 문제는 이러한 라이브러리들이 각각 독립적으로 개발/업데이트 되고 있다는 점입니다. 1년전에 제가 A 서버에 오라클 버전 X를 설치했다고 가정해봅시다. 그리고 오늘 동일한 하드웨어 스펙을 가진 B 서버에 똑같은 오라클 버전 X를 설치해보죠. 과연 둘은 동일하게 문제없이 작동할 수 있을까요? 안타깝게도 그렇지 않습니다.
First, the different OS could be installed on “B server”. (for example, Ubuntu 16.04 on “A server” and 18.04 on “B server”). Well, there could be a complain that “you should install same OS of course.” But in real, it is not that much simple as our expectation. Although they both installed Ubuntu 16.04 as OS, it is different issue to match its released version. Furthermore, even if they install exactly identical OS with single released version, it is challenging to install identical released version of every single libraries.
먼저 B 서버에는 다른 OS가 깔려있을수도 있지요. (예를 들어 A 서버에는 Ubuntu 16이, B 서버에는 18일 설치되어 있다고 해봅시다.) 물론 이렇게 반문할수도 있습니다. *“OS 정도는 당연히 맞춰줘야하는거 아니야?” 하지만 이게 생각만큼 단순하지 않습니다. 같은 Ubuntu 16일지라도 지속적인 업데이트를 거치면서 조금씩 변해왔기 때문에 그 세부 버전까지 완벽히 동일하게 설치하는 것은 조금 다른 이슈입니다. 설령 정확히 동일한 OS를 설치했다고해도 그 속의 드라이버, 여러 라이브러리들이 정확히 동일한 버전으로 설치되는 것은 상당히 번거롭고 변수가 많은 일입니다.*
Therefore, the idea occured which is called “Virualization”. The concept is simple: Let’s make a package that include entire system consisting of OS and libraries. Wasn’t if possbile before the existance of Docker? Yes, it is possible. But the overhead was another problem. The strength of Docker is right that point: it remarkably reduce the overhead so that it enables flesible publishing environment with very little compatiasability problem. 그래서 우리는 가상화라는 방법을 생각해냅니다. 연관성있는 모든 라이브러리를 묶어서 하나의 세트로 배포하는 것이지요. 그러면 도커 이전에는 이러한 방법이 불가능했던 걸까요? 물론 가능했습니다. 다만 그 오버헤드가 상당히 부담스러웠던 것이 문제였지요. 하지만 도커는 이러한 오버헤드를 대폭 단축시켜서 보다 유연하지만 Compatibility문제를 획기적으로 감소시킨 배포 환경을 가능하게 한것이지요.
As conclusion, the reason why we use docker in the project is clear.
자! 이제 다시한번 정리해보면 우리가 프로젝트를 수행할 때 도커를 이용하는 이유는 간단합니다.
To publish and administrate our service independently on compatibility issue.
Compatibility 이슈에 얽매이지 않고 서비스를 배포/관리할 수 있다.
Docker Installation
Installation guide for Docker is well explained at Docker official Homepage. Thus, I will briefly summarized the process in here.
도커 설치는 도커 공식 홈페이지에 설명되어있는 대로 따라가도 큰 무리 없이 설치 가능합니다. 여기서는 간단하게 요약해서 설명하고 넘어가겠습니다.
First, remove the old Docker if it exists.
만약에 존재할 수 있는 구 버전의 도커를 제거해줍시다.
sudo apt-get remove docker docker-engine docker.io containerd runc
Next, update apt and install related packages apt를 업데이트하고 관련된 패키지들을 설치해줍니다.
sudo apt-get update
sudo apt-get install apt-transport-https ca-certificates curl gnupg lsb-release
Then, Add Docker’s official GPG key. GPG key means GPU Privacy Guard key. It is composed of a public key and private key and they would be compared to inspect if the transfered data is forged or modified. Let’s understand the concept with the Docker example. First, the developer upload Docker S/W on remote S/W storage. At this time, the remote S/W storage add a signature on Docker S/W using the private key. Now the user downloads the public key by the developer (the first command at below) and down load the Docker S/W from the remoteh S/W storage. Then, the user compare the signature from downloaded program and public key to verify if the program is forged or modified during network process (the second command at below).
도커의 GPG key를 추가합니다. GPG key란 GNU Privacy Guard key의 줄임말입니다. GPG key는 개인키와 공개키로 구성되어 있고 이를 서로 대조해봄으로써 전달되는 데이터의 위조/조작 여부를 검사하기 위한 도구입니다. 마침 도커를 다루고 있으니 이를 예시로 설명해보도록 하겠습니다. 먼저 도커를 배포하는 도커 개발자는 원격 S/W 저장소에 도커S/W를 올립니다. 이때 원격 S/W저장소는 도커 개발자의 개인키로 도커S/W에 전자서명을 추가합니다. 이제 이를 다운받으려는 우리는 먼저 도커S/W의 공용키를 받습니다.(첫번째 명령) 다음으로 이 공용키를 이용하여 프로그램 다운을 요청하면 우리는 이 공용키와 다운받은 도커S/W의 전자서명을 비교하여 S/W가 네트워크 구간에서 조작되지 않았는지 검증합니다.(두번째 명령)
# Add Docker's official GPG key
# Docker의 GPG 키를 추가합니다.
curl -fsSL https://download.docker.com/linux/ubuntu/gpg | sudo gpg --dearmor -o /usr/share/keyrings/docker-archive-keyring.gpg

# set up the stable repository. Caution that I use 'amd64'
# 레퍼지토리를 세팅합니다. 저는 'amd64'에 해당합니다.
echo "deb [arch=amd64 signed-by=/usr/share/keyrings/docker-archive-keyring.gpg] https://download.docker.com/linux/ubuntu $(lsb_release -cs) stable" | sudo tee /etc/apt/sources.list.d/docker.list > /dev/null

# Install Docker
# Docker를 설치합니다.
sudo apt-get install docker-ce docker-ce-cli containerd.io

# verify that Docker Engine is installed correctly
# Docker가 잘 설치됐는지 확인합니다.
sudo docker run hello-world