[KEPCO] Constructing Demo System for AI based Diagnosis_4
Goal
To administrate
Oracle DBby usingSQL DeveloperonM1 MacM1 Mac에 SQL Developer를 이용해 Docker에 붙어보자
System Specification
This project uses following HW resources.
본 프로젝트에 사용된 HW 리소스는 다음과 같습니다.
- Oracle Server: Linux (
Ubuntu 20.04)- AI Server: Linux (
Ubuntu 18.04)- Client Server: macOS (
Big sur) on M1 chip (Today’s Use)
Intro
Oracle offers SQL Plus that excellent tool for DB administration, but most of users prefer handling SW based on GUI form. Especially, the general users, who are not the developer, could face a barrier to entry on handling data only with command based SQL Plus. For this issue, Oracle offers a S/W whose name is SQL Developer based on GUI. As with SQL Plus, SQL Developer enables to control Oracle DB on remote server. This post will explain how to set up SQL Developer on the Client Server which operated under macOS Big Sur with Apple silicon M1 chip.
오라클은 DB 관리를 위해 SQL Plus라는 훌륭한툴을 제공해주지만, 대부분의 유저들은 GUI형태로 구현된 SW를 다루는 것을 선호하는 것이 현실입니다. 특히 개발자가 아닌 일반사용자들의 경우 Command 기반의 SQL plus만으로 데이터를 다루기에는 분명 진입장벽이 존재합니다. 이를 위해 오라클에서는 SQL Developer라는 훌륭한 GUI 기반의 S/W를 제공합니다. SQL Developer는 SQL Plus와 마찬가지로 원격으로 우리가 원하는 서버의 오라클 DB를 제어할 수 있기 때문에 한번 구축해놓으면 오라클 서버에서 직접 작업하는 불편함을 생략할 수 있지요. 오늘 포스트에서는 테스트 환경인 macOS Big Sur에서 SQL Developer를 이용해 오라클 DB를 사용해보도록 하겠습니다.
The order of Oacle SQL Developer installation
The installation of Oracle SQL Developer is well explained in an installation notes at Oracle Webpage. However, I underwent several issues because of mac OS and M1 chipset. In this post, I will described the process that I experienced.
Oracle SQL Developer 설치는 오라클 홈페이지에 나와있는 Installation Notes를 그대로 따라하시면 어느정도 해결됩니다. 다만, macOS를 쓴다는 점에서, 또 M1 칩셋을 사용한다는 점에서 조금 특이사항이 있었는데요, 이를 천천히 살펴보도록 하겠습니다.
Install JDK
To use SQL Developer, JDK(Java Development Kit) 8 or 11 is required. In my case, I used JDK 8 to imitate the SQL Developer of KEPCO, but JDK 11 doesn’t result in any other issue. For the installation just download dmg file for macOS x64 at Oracle JKD Download and run.
먼저 SQL Developer를 사용하기 위해서는 JDK(Java Development Kit) 8 또는 11이 필요합니다. 저의 경우 KEPCO에서 사용하는 환경을 최대한 반영하기 위해 JDK 8을 설치하였는데요, JDK 11로 설치해도 무방합니다. 설치는 오라클 JDK 다운로드 사이트에서 ‘macOS x64’에 해당하는 dmg파일을 받아 설치하면 끝입니다.
Install Oracle SQL Developer
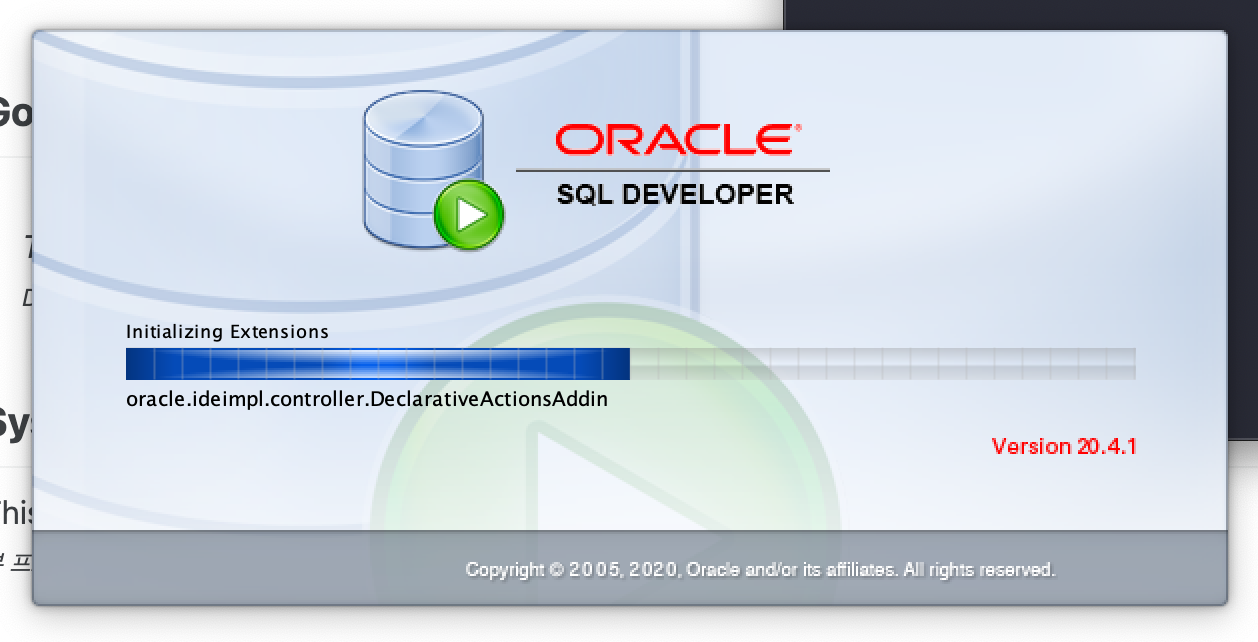
Then, install SQL Developer. Likewise, Download the installation file for macOS x64 at SQL Developer Download and run it.
다음으로 SQL Developer를 설치해줍니다. 마찬가지로 오라클 SQL Developer 다운로드 사이트에서 ‘macOS x64’에 해당하는 파일을 받아 설치해줍니다.
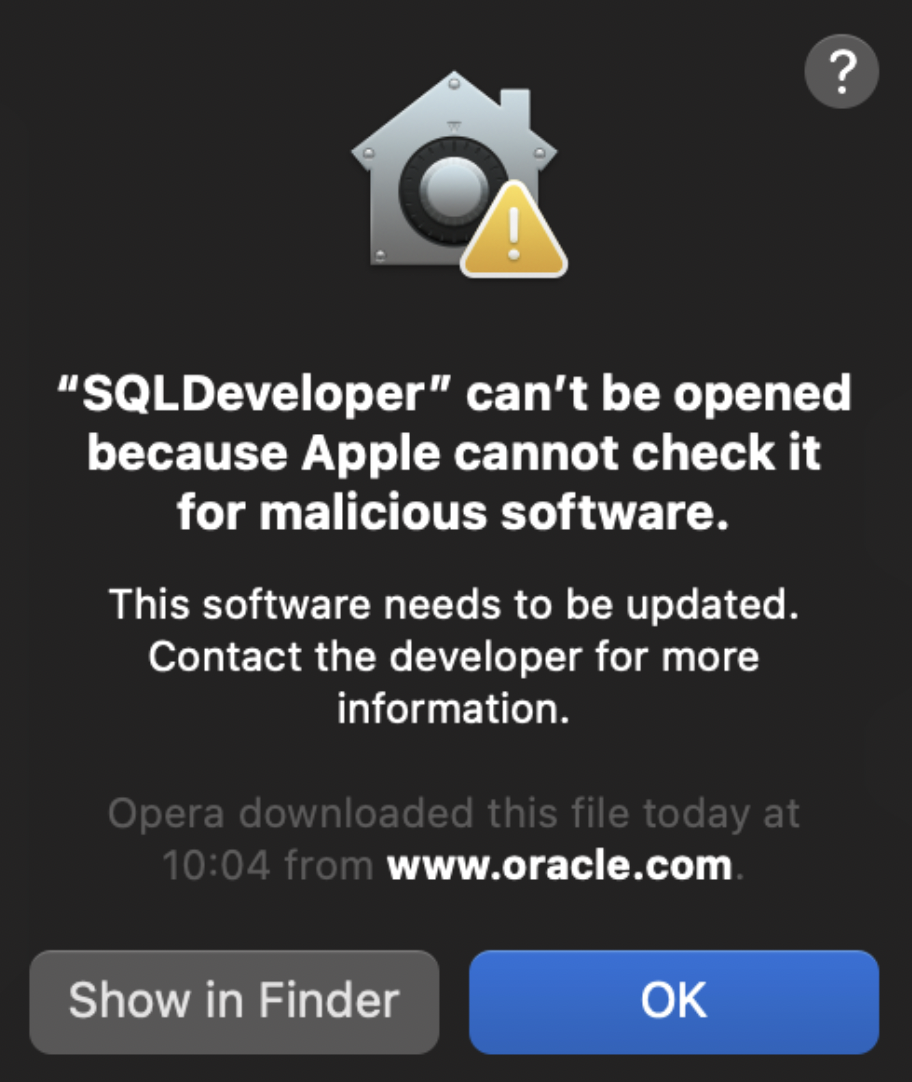
You will encounter a message like above, then just “allow apps downloaded from ~” at the general tab of Security & Privacy which could be easily found by Spotlight of Mac.
처음 설치후 SQL Developer를 실행하면 위와 같은 메세지가 나타날텐데요, 이 경우 Mac의 Spotlight를 열고 ‘Security & Privacy’에 들어가 ‘General’ 탭에서 앱 다운로드를 허용해주어야 합니다.
Uninstall Java 16 and reinstall Java 8
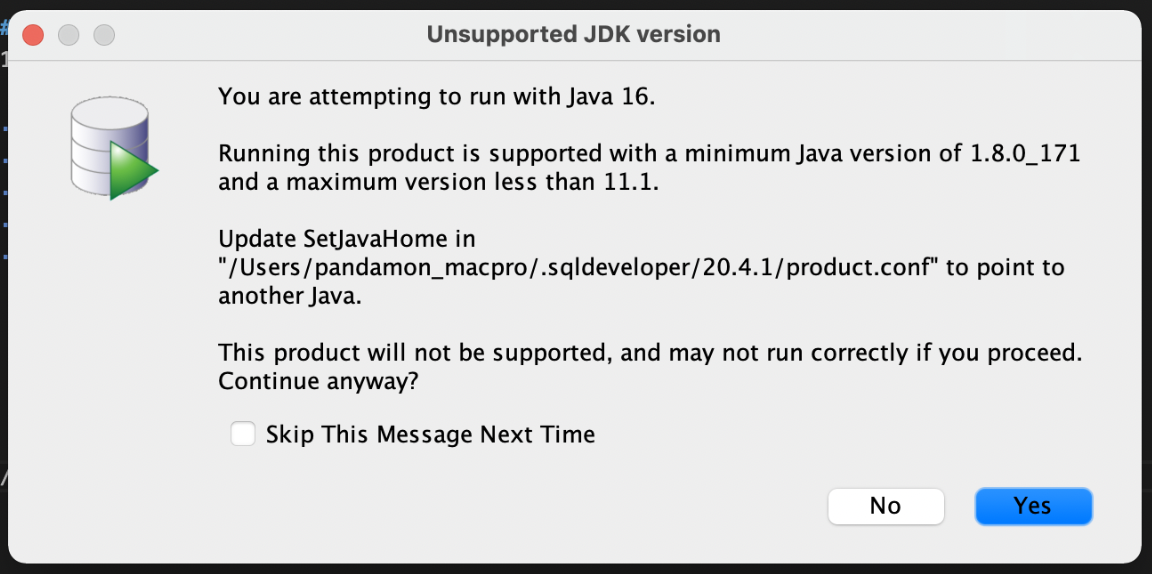
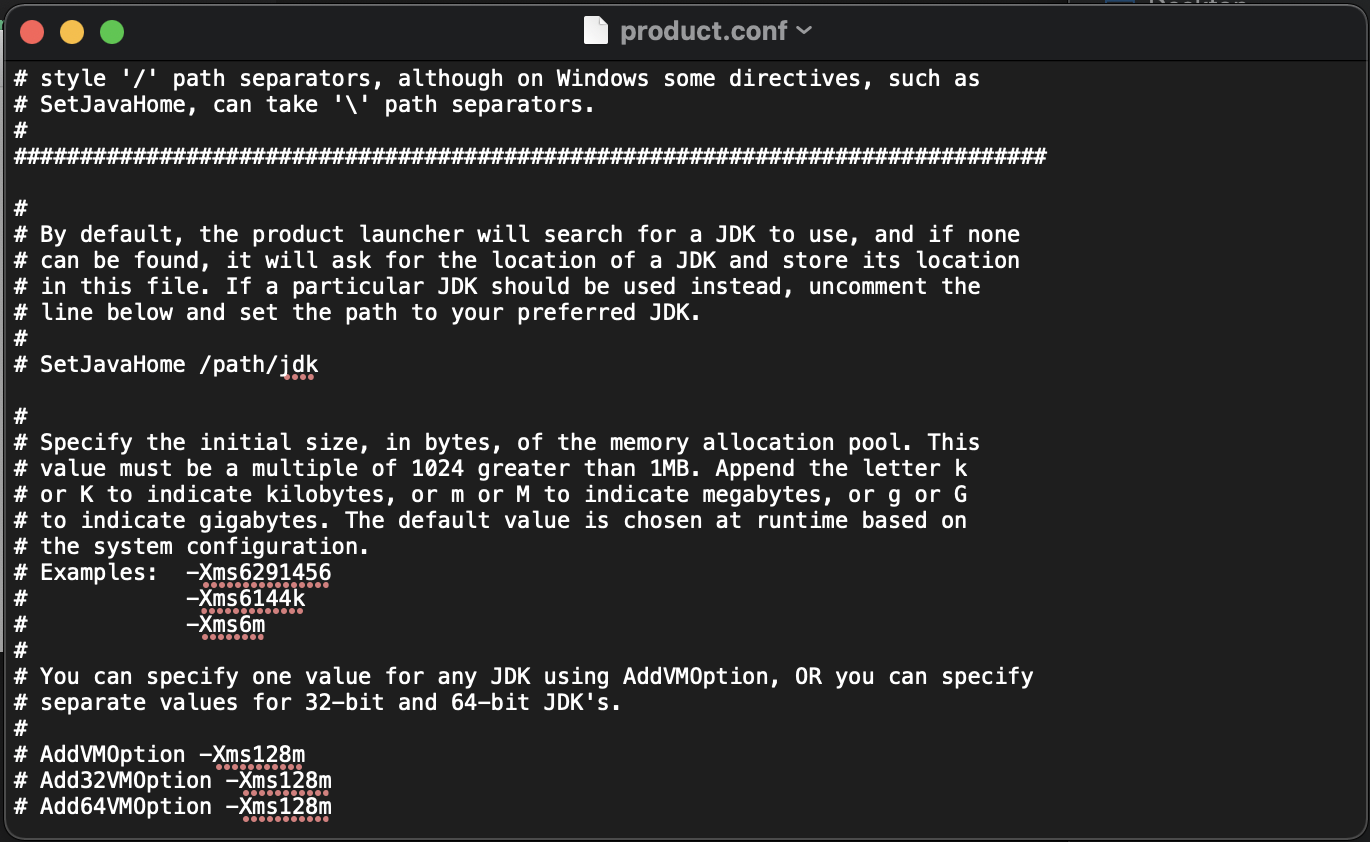
“You are attempting to run with Java 16. Runnig this product is supported with a minimum Java version of 1.8.0_171 and a maximum version less than 11.1”. It show that I have too recent release Java 16. I definitely install the JDK version 8, but what happen? The reason was clear. I just installed higher version of Java previously. So it is required to change the version of Java that SQL Developer would use. It could be solved by modifying product.conf of SQL Developer at the path of /Home/.sqldeveloper/<version>/.
*언제나 이런 셋업은 마음처럼 스무스하게 진행되지 않습니다. 내용인즉슨 JDK 버전이 맞지 않는다는 것이겠지요. 왜 이런 현상이 벌어졌을까요? 찾다찾다보니 제가 이전에 다른 작업을 하면서 높은 버전의 자바를 설치한적이 있었는데 이게 말썽을 일으킨겁니다. 자 이제 SQL Developer가 사용할 JDK 버전을 맞춰줘야합니다. 이건 ‘/Home/.sqldeveloper/[version]/product.conf’를 수정해서 해결할 수 있습니다.
# add below to product.conf
SetJavaHome /path/jdk~
The most confident way is to remove other Javas that weren’t used. In my case, I just remove entire Javas and reinstall JDK 8. It is not recommended, but pretty sure.
가장 확실한 방법은 사용하지 않는 Java를 삭제하는 방법도 있습니다. 저의 경우 홧김에 나머지 자바를 삭제하고 JDK8를 다시 설치하였는데요, 이는 다음과 같습니다.
# Uninstalling Java on the Mac
sudo rm -rf /Library/Internet\ Plug-Ins/JavaAppLetPlugin.plugin
sudo rm -rf /Library/PreferencePanes/JavaControlPanel.prefPane
sudo rm -rf /Library/Application\ Support/Oracle/Java/
sudo rm -rf /Library/Java/JavaVirtualMachines
SQL Developer is not opened!
Now, We believe that SQL Developer will operate well, but unfortunately it does not. When I try to open it, it just load and no more actions occur. Then why? I googled very hard, and found that it is always the matter of M1 Chipset. In my best googling, there is no solution yet, and we need to use an expedient. At terminal, command as follow:
자 이제는 과연 SQL Developer가 잘 작동할까요? 슬프게도 SQL Developer를 키면 몇번 둥둥 뜨고는 감감 무소식입니다. 이번에는 도대체 무슨 이유일까요? 열심히 구글링을 해보니 역시나 ‘M1 Chipset’의 문제였습니다. 아무리 찾아봐도 아직 뚜렷한 해법은 나타나지 않은 것 같고, 우선 편법으로 아래와 같이 SQL developer를 실행할 수 있습니다.
cd /Applications/SQLDeveloper.app/Contents/resources/sqldeveloper
zsh sqldeveloper.sh
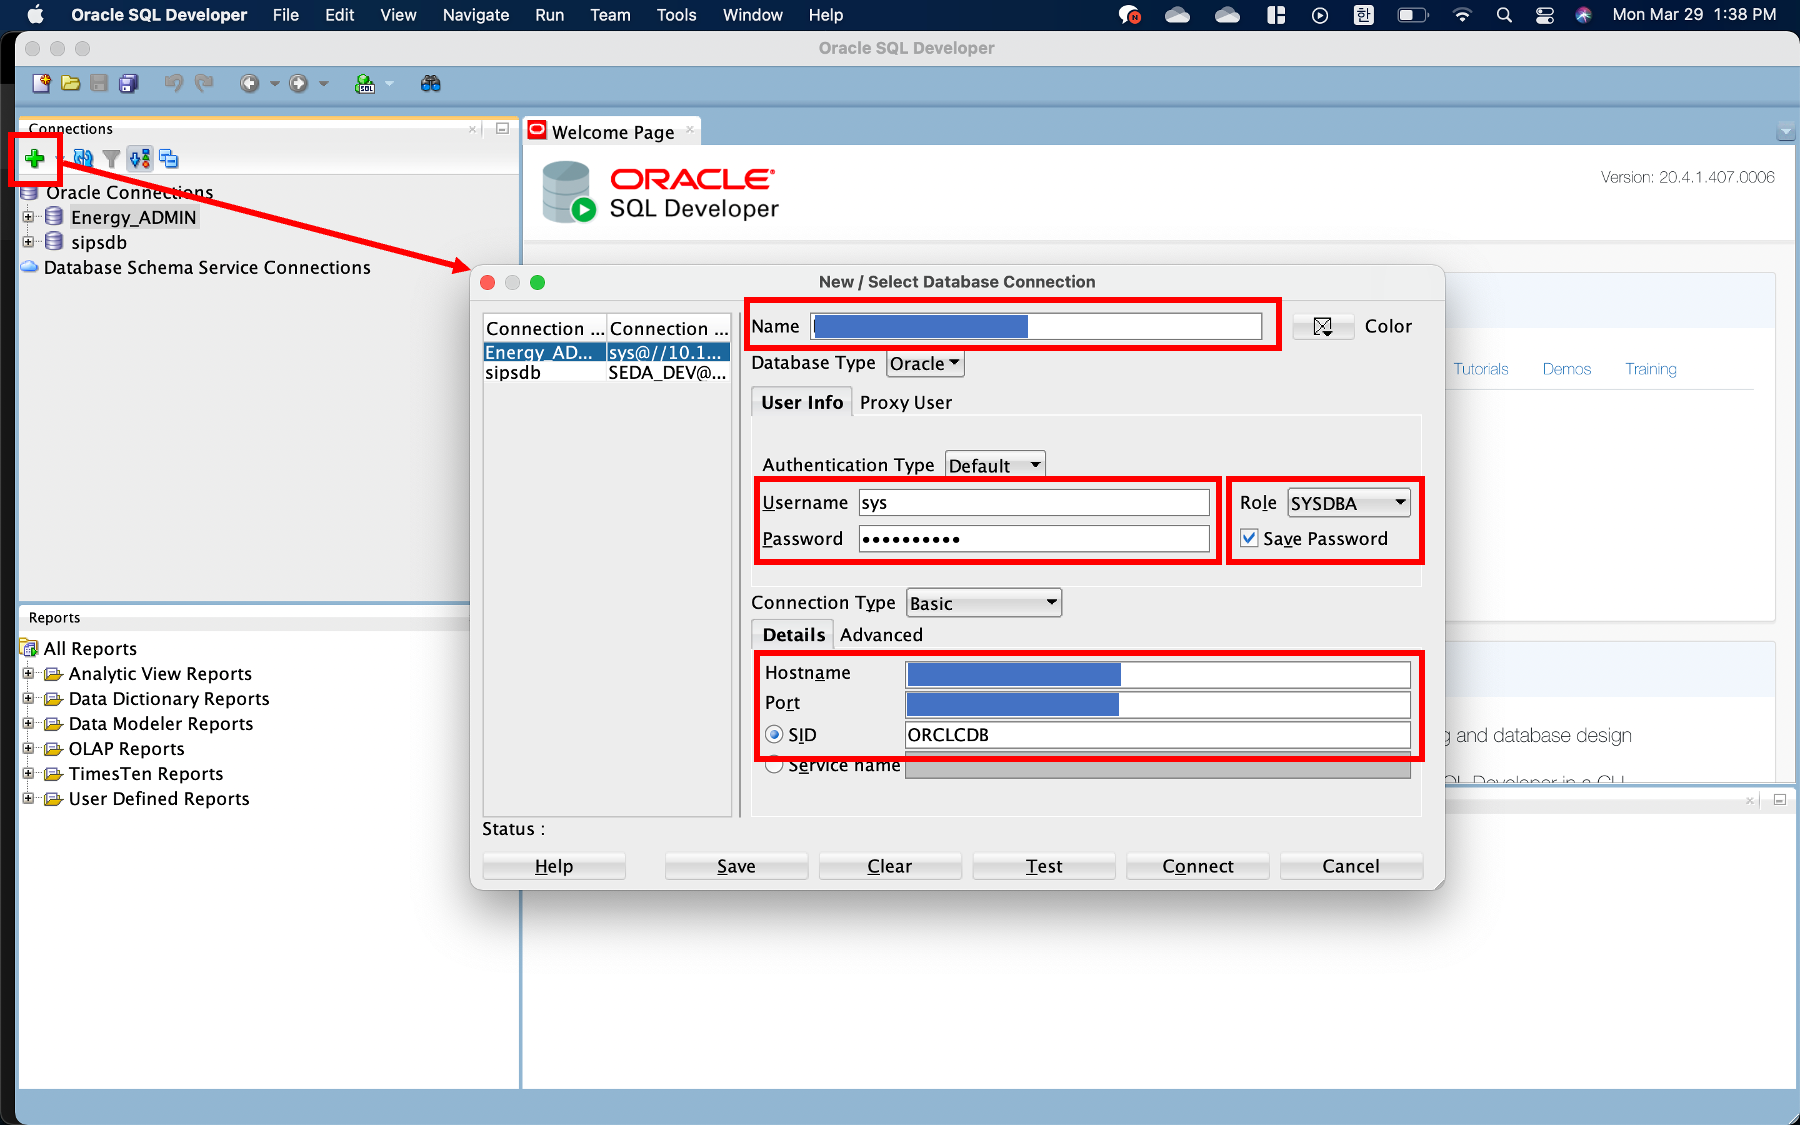
Connect SQL Developer to DB
As a last, Let’s access to Oracle DB on Oracle Server using SQL Developer. As explained in last post, the default set up for ID, PW and SID is sys, Oradoc_db1, and ORCLCDB, respectively. First, when you open SQL Developer, press the green cross icon on upperleft to add DB. When the page pop up, type the name of DB on Name. Then, on User Info tab, put sys and Oradoc_db1 to Username and Password, and change the Role as SYSDBA. Finally, put your IP address of Oracle Server on Hostname, the port on Ports, and ORCLCDB on SID.
마지막으로 이제 우리가 Oracle Server에 만들어두었던 ‘Oracle DB’에 접속해봅니다. 이전 포스트에서 설명한 것처럼 기본적으로 세팅되어 있는 dba권한의 ID와 PW는 각각 ‘sys’와 ‘Oradoc_db1’입니다. 또 DB의 SID는 ORCLCDB로 설정되어 있습니다. 먼저 SQL Developer가 열리면 왼쪽 상단의 초록색 플러스 아이콘을 클릭하여 DB를 추가합니다. 팝업 창이 열리면 ‘Name’에 원하는 DB의 이름을 넣어줍니다. 다음으로 ‘User Info’탭에서 Username과 Password는 각각 디폴트로 설정되어있던 ‘sys’와 ‘Oradoc_db1’을 입력하고 Role을 ‘SYSDBA’로 변경해줍니다. 마지막으로 ‘details’ 탭에서 ‘Hostname’에는 Oracle Server의 IP주소를, ‘Ports’에는 지정한 포트를, 그리고 ‘SID’에는 기본값인 ‘ORCLCDB’를 설정하면 됩니다.