[KEPCO] Constructing Demo System for AI based Diagnosis_6
Goal
To import data from
Oracle DBon the environment ofPythonusingcx_Oracle
cx_Oracle을 이용해서 파이썬에 오라클 데이터를 불러오자
System Specification
This project uses following HW resources.
본 프로젝트에 사용된 HW 리소스는 다음과 같습니다.
- Oracle Server: Linux (
Ubuntu 20.04)- AI Server: Linux (
Ubuntu 18.04) (Today’s Use)- Client Server: macOS (
Big sur) on M1 chip
Intro
cx_Oracle is a Python extention module that enabes access to Oracle DB. In my case, I predefine a string of Oracle Command, execute it using cx_Oracle, and get the data as python dictionary type. In this post I will explain the process step by step.
‘cx_Oracle’은 파이썬에서 ‘Oracle DB’에 접근하기 위한 Extention입니다. 저의 경우 파이썬상에 스트링으로 오라클 명령어 스트링을 만들고 이를 ‘cx_Oracle’를 통해 Oracle에 Excute하고 그 결과값을 파이썬의 Dictionary형태로 받아오는 식으로 이를 사용하고 있습니다. 본 포스트에서는 이 일련의 과정을 따라가보도록 하겠습니다.
You can easily install cx_Oracle using pip server.
‘cx_Oracle’은 파이썬 Extension인 만큼 pip를 이용해 쉽게 설치할 수 있습니다.
python -m pip install cx_Oracle --upgrade
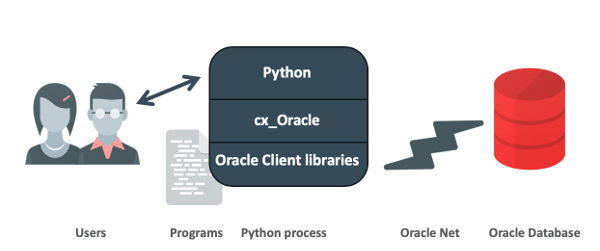
Setting up for cx_Oracle
As described in above figure, Oracle Client Libraries are required to access Oracle DB using cx_Oracle. Thus let’s install this as a first step and it is easily found in Oracle’s Webpage. Among various installation methods, I will install the client using zip file. First, download the clinet file as follow command.
위의 그림에서 설명된 것처럼 ‘cx_Oracle’을 이용해 ‘Oracle DB’을 사용하기 위해서는 ‘Oracle Client Libraries’가 필요합니다. 따라서 먼저 이를 설치해주도록 하겠습니다. ‘Oracle Client’는 오라클 홈페이지에서 쉽게 확인이 가능합니다. 저는 다양한 설치 방법중 zip파일을 이용해 설치하도록 하겠습니다. 먼저 아래와 같이 클라이언트 파일을 다운받아줍니다.
# with option `-O`, curl will save the file with name of the remote file.
curl -O https://download.oracle.com/otn_software/linux/instantclient/199000/instantclient-basic-linux.x64-19.9.0.0.0dbru.zip
Then, extract the Oracle Client and add it on Oracle Configuration.
다음으로 ‘Oracle Client’의 압축을 풀고 이를 오라클 Configuration에 등록합니다.
mkdir -p /opt/oracle
unzip instantclient-basic-linux.x64-19.9.0.0.0.zip -d /opt/oracle/

sudo sh -c "echo /opt/oracle/instantclient_19_9 > /etc/ld.so.conf.d/oracle-instantclient.conf"
sudo ldconfig
Now, let’s use cx_Oracle in Python. I previously created a table with the name test_tabe, made a key ‘Hello’, and insert a VARCHAR value ‘Oracle’. I am goona call and print it.
자 이제 파이썬에서 ‘cx_Oracle’을 사용해볼까요? 저는 예제로 ‘test_table’이라는 테이블에 ‘Hello’라는 키를 만들고 ‘Oracle’라는 VARCAHR를 넣어두었습니다. 이를 호출해서 프린트해보도록 하겠습니다.
import cx_Oracle
# initialize oracle client
LOCATION = '/opt/oracle/instantclient_19_9'
cx_Oracle.init_oracle_client(lib_dir=LOCATION)

# set the configuration of your oracle dB
host = cx_Oracle.makedsn(<addresse>, <port>, <SID>) # New D
id = <id>
pw = <password>

# make a query.
query = 'select * from test_table'

# connet to Oracle DB
conn = cx_Oracle.connect(id, pw, host)

# convert data to dictionary
def makeDicFactory(cur):
    columnNames = [d[0] for d in cur.description]
    def createRow(*args):
        return dict(zip(columnNames, args))
    return createRow

cur = conn.cursor()
cur.execute(query)
cur.rowfactory = makeDicFactory(cur)
result = []
for row in cur.fetchall():
    result.append(row)
cur.close()
conn.close()

print(result)
“설명 필요할듯”
